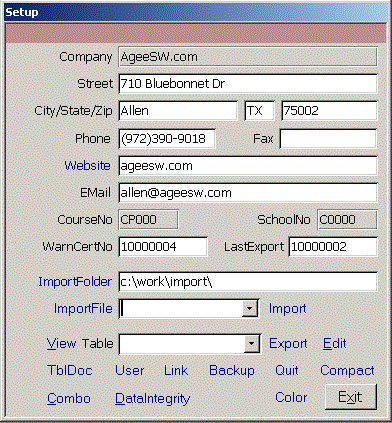
Click Setup on the Main menu to see the Setup form. Enter your company contact info and ImportFolder.
Blue links on the form perform like compact command buttons. Hover over the link or button to see it does.
The Website link browses to your website. ImportFolder opens your import folder so you can drag files into it.
WarnCertNo warns you when you issue a CertNo equal to or larger this number. Set it to
remind you to buy more CertNos. LastExport is the last CertNo exported for upload to TDLR.
The ImportFile combo shows .CSV files in the ImportFolder. Click the blue ImportFile link to
view the import file in Excel. Click Import without selecting a file to get a sample CSV file.
To import, select a file and click Import. Within a second or two, you'll see a message:
Imported x of x certs. Find Sel recs on Cert form. The import function will not let you
import duplicate CertNos. Open the Cert form and enter Sel in the Find box to see the imported
recs.
To view any raw table in the system, select it in the Table combo and click View or export it to
CSV, DBF (dBase, FoxPro, Clipper), HTM (for web browsers), MDB (Access), RTF (Word or WordPad), SNP
(free Access reader from Microsoft), TXT or XLS (Excel) formats.
Click Edit to open a form to edit the records in a form. While viewing a table, you can
drag the column headers into the order you want, highlight several columns together
and right click, sort A-Z or descending Z-A. When you are done viewing, answer
NO when asked if you want to save the table layout.
Click TblDoc to create a data dictionary defining all fields in the database application. This HTML
file is opened in the user's browser. The description property shown in TblDoc appears as StatusBar text
on forms.
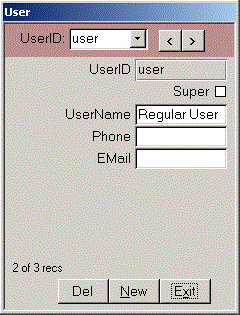 The User form lets the Super user add or edit users. Normal users are limited in the data they can
edit on themselves, but they can change their password here. After confirming the password, be sure
to click Email or UserName instead of pressing the Enter or Tab keys. This allows the encrypted passwords in
the MDW file on your c: drive to be copied to the server so you can log in anywhere.
More info on setting up users
Click Link to change where the data tables are located. If you see the box asking where the data tables
are upon opening the database, you may have a network error and should call for support to avoid
storing your work in the wrong location. See Network Help for more info
on setting up your network and backup.
Backup quickly saves a copy of the data tables to another location such as a flash drive.
Click Quit to force users out of the database for maintenance.
Compact rebuilds the indexes, repairs and reduces the size of the tables database. This requires
exclusive access to the database, so it is best done after work. You can use the Quit function if
people are widely distributed. If you change lots of data, you will
notice improved performance if you compact weekly.
The User form lets the Super user add or edit users. Normal users are limited in the data they can
edit on themselves, but they can change their password here. After confirming the password, be sure
to click Email or UserName instead of pressing the Enter or Tab keys. This allows the encrypted passwords in
the MDW file on your c: drive to be copied to the server so you can log in anywhere.
More info on setting up users
Click Link to change where the data tables are located. If you see the box asking where the data tables
are upon opening the database, you may have a network error and should call for support to avoid
storing your work in the wrong location. See Network Help for more info
on setting up your network and backup.
Backup quickly saves a copy of the data tables to another location such as a flash drive.
Click Quit to force users out of the database for maintenance.
Compact rebuilds the indexes, repairs and reduces the size of the tables database. This requires
exclusive access to the database, so it is best done after work. You can use the Quit function if
people are widely distributed. If you change lots of data, you will
notice improved performance if you compact weekly.
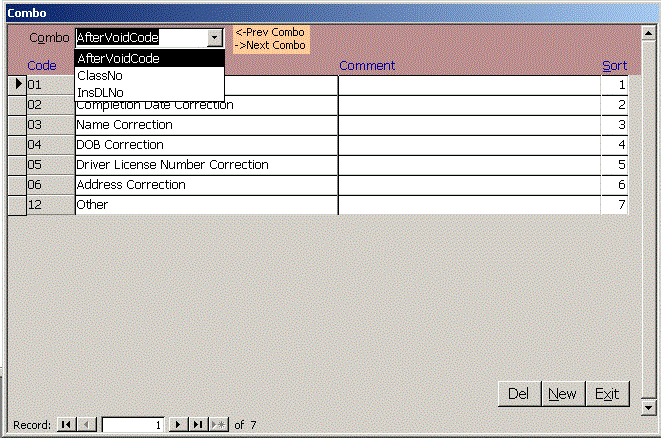 The Combo form lets you edit tables in your system that only have one or two fields without having to
pay to have forms created for each table. Choose the combo you want to edit in the colored area
at the top of the form or use the right or left arrow keys to skip through the combos.
Set up a ClassNo for each TDLR approved class. Use InsDLNo to set up instructors. Enter their four digit
TDLR code in the Code column, first name in Descrip and last name in Comment. This will fill the
instructor's name when you enter the InsDLNo.
You can put a decimal value in the Sort field to make your
own custom sort order for the combo dropdown. Click the blue link Code, Descrip or Sort to sort on that
column. It is easy to use comments for special purposes such as help or groups in the Combo form.
The Combo form lets you edit tables in your system that only have one or two fields without having to
pay to have forms created for each table. Choose the combo you want to edit in the colored area
at the top of the form or use the right or left arrow keys to skip through the combos.
Set up a ClassNo for each TDLR approved class. Use InsDLNo to set up instructors. Enter their four digit
TDLR code in the Code column, first name in Descrip and last name in Comment. This will fill the
instructor's name when you enter the InsDLNo.
You can put a decimal value in the Sort field to make your
own custom sort order for the combo dropdown. Click the blue link Code, Descrip or Sort to sort on that
column. It is easy to use comments for special purposes such as help or groups in the Combo form.
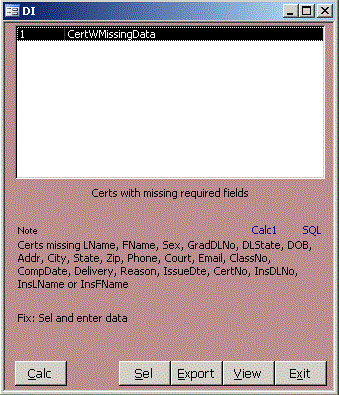 The Data Integrity form helps you keep your data complete and accurate without slowing data entry because
the data wasn't currently available. In this example, we have a select query
qDICertWMissingData. It is easy to create dozens of these queries in an hour, so any time
you encounter a data entry problem, we can create a DI query to avoid it in the future.
There is normally a Note describing the problem and a Fix line telling exactly how to fix the problem.
Click Calc1 to count the records found by this query or Calc to count records found for each data integrity query.
Click the blue SQL link to see the actual SQL of the query. Click View to see the records found in a read-only format.
Click Sel to Select the records found in the Contact table and open the Contact form with only the problem records
selected.
Click Export to export the records found to Excel, CSV, Text, etc.
If it is possible to fix a problem using an SQL Update query, we can create a query qFix query. A Fix button is then
visible and the user simply clicks Fix and confirms that they want to run the query to fix the problem.
If all queries show 0 records, there are no problems with your data.
The Data Integrity form helps you keep your data complete and accurate without slowing data entry because
the data wasn't currently available. In this example, we have a select query
qDICertWMissingData. It is easy to create dozens of these queries in an hour, so any time
you encounter a data entry problem, we can create a DI query to avoid it in the future.
There is normally a Note describing the problem and a Fix line telling exactly how to fix the problem.
Click Calc1 to count the records found by this query or Calc to count records found for each data integrity query.
Click the blue SQL link to see the actual SQL of the query. Click View to see the records found in a read-only format.
Click Sel to Select the records found in the Contact table and open the Contact form with only the problem records
selected.
Click Export to export the records found to Excel, CSV, Text, etc.
If it is possible to fix a problem using an SQL Update query, we can create a query qFix query. A Fix button is then
visible and the user simply clicks Fix and confirms that they want to run the query to fix the problem.
If all queries show 0 records, there are no problems with your data.
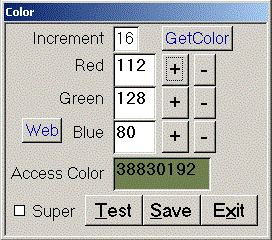 Color lets you set the form color for different users or to show a difference between normal
and super users. Click GetColor to get the color property that is currently used. Check Super
for super user or uncheck it for normal users. Click the + or - key by Red, Green or Blue to
experiment with different colors or click Web to see a palette of web colors. When you find
a color you like, click Save to save it for all forms for all users or super users. The
default color is Rosy Brown, 41975984.
Close
Color lets you set the form color for different users or to show a difference between normal
and super users. Click GetColor to get the color property that is currently used. Check Super
for super user or uncheck it for normal users. Click the + or - key by Red, Green or Blue to
experiment with different colors or click Web to see a palette of web colors. When you find
a color you like, click Save to save it for all forms for all users or super users. The
default color is Rosy Brown, 41975984.
Close
|