Click Patient on the Main menu to open the Patient Form. Select a Patient. Use the Patient combo box to select a patient by last name or enter a PatientID in the Find box. If you enter part of a name, phone number, status or comment in the Find box, it will filter the records in the Patient combo to show records matching that criteria. You can use the | character to delimit strings for a more specific search. For example, |Joh would find patients who had a last name of Johnson or a first name of John, but would not include those with a last name of St. John. A search for Dallas would find by first name, but not by city. A search for 123| would find HomePhone, CellPhone or (work) Phone ending in 123, but would not find 9721234444. If the Inactive checkbox is unchecked, patients with a Status of Inactive will not be shown in the Patient combo. Check the ShowSel box to show only patients who have the Sel checkbox checked. You can use the SelAll with the Find box to Sel a group of patients, such as those with a certain value in Status or Comment. Use the Clear n Sel recs link to clear a selection. You can use this to Sel all records who have a Status of Physical (need physical) or exclude those who have a status of Inactive. The > and < buttons move to the next or previous patient in the combo. The PgDn and PgUp keys work similarly. An underlined letter on a label is a hotkey. For example, Alt-F moves your cursor to the Find box, clears the box and shows all records. The number in the lower left corner shows how many records meet the Find criteria and which record is selected. There is a help line at the bottom of the screen to tell you what belongs in each field of the form. If you hover over a button or blue link, a yellow tool tip will tell you what it does. A box in the lower right corner of the form shows documents needed for the patient: Lab, Physical, DL (Driver License), EK (EKG) or TC (Treatment Consent). If you double click a date field, it enters the current date or blanks the field if it already has a date. The numeric keypad + or - key adds or subtracts a day for each key press. You can also enter dates like 7/4 for July 4th of the current year. Fields with a white background can be changed. Fields with a gray background cannot. Some fields are locked for normal users and only Super users (in User form) can edit them.

Click the BodyComp link at the bottom of the Patient form to open the Body Composition Form to the most recent record. PgDn to move to previous BodyComp records or PgUp to move to the next record. Summary shows a report of all BodyComp records, View shows all fields of the current record. Gender and Age are copied from the Patient form. This form is designed for the MS Access weight loss clinic database.

Click Doc at the bottom of the Patient form to open the Doc Form. Scan the document using the File button on the scanner. After the last page, press the Finished button on the scanner to save the document as 0.pdf in the DocFolder (set on the Setup form). Enter a two character code such as DL for Driver License, EK for EKG, LB for Labs or TC for Treatment Consent to create a link and rename 0.pdf to include the PatientID for that document. You can also manually enter a title and filename. The OpenDocFolder links you to the scanned document folder to manually rename documents if necessary. When opened from the Patient form, you'll only see docs for that patient. From the Setup form, you'll see docs from all patients in the medical office. Find works similar to the Patient form Find except it finds strings in |DocTitle|DocFile|Comment|.

Click Injection on the Patient form to open the Injection Form. Verify the Med, date, patient and dose that are automatically added. Enter the weight, blood pressure and your initials.

Click Invoice at the bottom of the Patient form to open the Invoices Form. The number of invoices is shown in the link. You can create a new invoice for a patient from this form or from the New Invoice link on the Visit form. Use the Sel checkboxes or SelAll link to select invoices to print from the Report form if the patient needs another copy.

Click Edit or double click a record on the Invoices form to open an Invoice Form. Add data to the last detail line or click DelDetailLine to delete a line. If you are purchasing supplies from a vendor, check the PO box. You can enter the ICD9 diagnostic code for each detail line. If you sell weight loss supplies, you can enter them too. Double click the Invoice Date to show you have no more detail lines to add. Double click the Paid Date when the invoice is paid. Enter the method of payment and use the comment field if two methods are used. Click the View link to see a printable invoice.

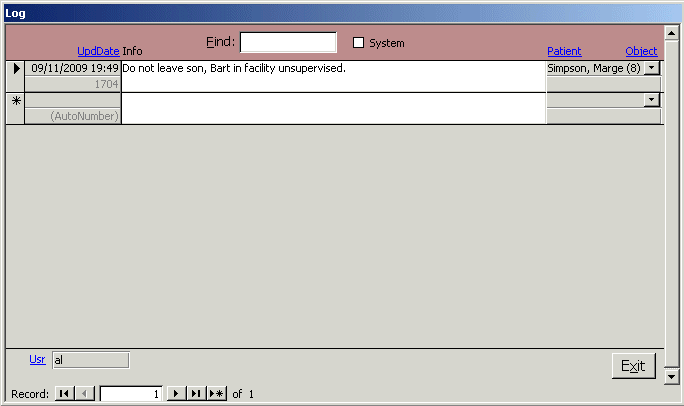
Click Log on the Patient form or Setup form to open the Log Form. Log entries become locked for normal users after 30 minutes. System log entries for user logon and logoff, web upload and download, deleting records and viewing HIPAA sensitive reports are always read only and available on the Setup form. The Log on the Setup form shows log entries for the entire health clinic.

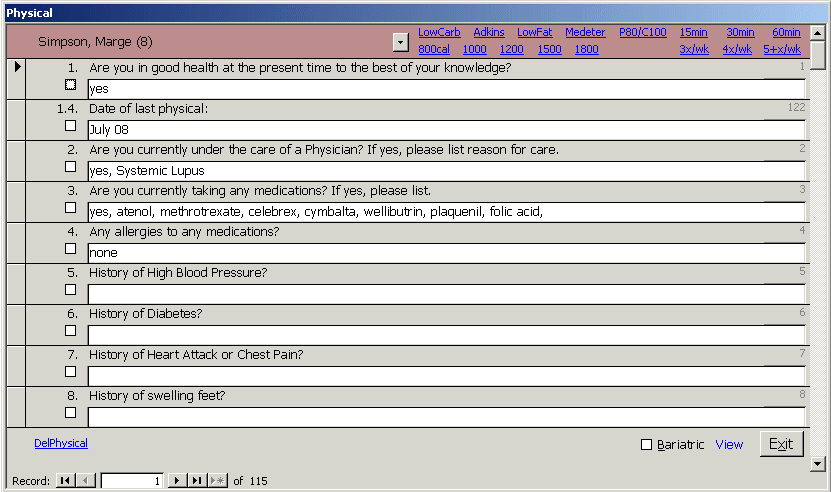
Click Physical from the Patient form to open the Physical Form. If one doesn't exist for the patient, one will be created. Click DelPhysical to delete the current physical and create a new one. Check the Bariatric link to switch between the physical questions and bariatric physical questions. You can set up the questions on the Setup, Question form. QuestionIDs are on the left of each line. Click View to see a printable report of the form. To speed data entry, you can click links to commonly used terms at the top of the form. The patient can complete the physical online on a secure site and a user can import the online database from the Setup form before the visit.

Click Schedule on the Patient or Setup form to open the Schedule Form. The patient's default provider is selected, but you can choose another doctor, nurse or provider if you like. Use the < and > links to move back or ahead a day. Days not normally scheduled are skipped unless you check override. You can use Alt-N (Next) or Alt-P (Previous day) too. Click Wk or press Alt-K to move ahead a week. Click Mo or press Alt-M to move ahead a month. Click LastVisit or press Alt-L to jump to the most recent visit for the patient. Click again for the visit before that. To schedule a visit, double click the time slot. A record in the Visit table will be created at this time. To remove a visit from the schedule, delete that Visit record. You can set the office hours for each day for each provider's schedule on the Setup, Office Hours form. The interval on the Office Hours form lets you block time as short as 15 min for each visit or multiple blocks of time. If you haven't schedule a visit for a new patient, the provider will default to New Patient. Note the N's in the New column. These are the recommended times to schedule a new patient visit. By default, the new patient visit will schedule 45 min with the New Patient provider, a 30 min break to watch a video and 45 min with the patient's default provider. If there is a conflict, you will be warned. X's in the Prv column advise you that the time for a new patient is not available because there will be a conflict for the other provider. The provider must check the Override box to schedule visits outside normal office hours. If a patient has missed enough visits, check New Patient or Restart to schedule time to catch up labs and paperwork. By default, restarts schedule 30 min with the New Patient provider followed by 15 min with the patient's primary provider. Click the Mail link to email an appointment notice to the patient. Click Print to print the daily schedule, or View to view it on screen. Click WkRpt to view the provider's schedule for the entire week. Double click any schedule record to edit the Visit record for that time.

Click Visit from the Patient form or Setup form to open the Visits Form. You will be alerted if the patient is missing critical paperwork. Click the VisitID, Patient, VisitDate or Sel to sort by that field. Click again to sort in descending order. This works for any blue links at the top of a column throughout the application. Click View to manage the Visit report.

Click Edit or double click a record on the Visits form to open the Visit Form. You can document weight loss progress or a cosmetic procedure. You can open the Physical, BodyComp or Invoice forms from this form. If an invoice hasn't been created for the visit, the link will say Create invoice. Ohterwise, you'll see the InvoiceID. If you write a prescription, select the pharmacy the patient prefers. Click the Pharmacy link to edit or add a pharmacy. Click EMail to email the prescription to the pharmacy or Fax to fax it.