Access VBA Form Tutorial

Here are the steps to create the tutorial database from scratch::
If you prefer, you can download it from here.
If you have questions, please contact me.


Set Up the Database

  1. Create a new database. (Open Access, Blank Access Database, name it c:\work\Tutor.mdb)
  2. Set database properties. Tools, Options, General, uncheck TrackNameAutoCorrectInfo to prevent corruption.
  3. Add a reference to the better performing DAO. Modules, New, Tools, References.
    1. Check Microsoft DAO 3.6 Object Library
    2. Click OK to close the window.
    3. Click Tools, References, highlight Microsoft DAO 3.6 and click the arrow above priority to move DAO above Microsoft ActiveX Data Objects 2.1 Library.
    4. Click OK to save the settings and click the X in the upper right corner to close the Module design view back to the database window.
  4. Create the following sample tables (Click Tables, New, Design View):

    tblContact
    ContactID Long Primary key
    LastName T 20 Contact's last name
    FirstName T 15 Contact's first name
    Company T 50 Contact's company
    Street T 35 Company billing street address
    City T 35 Company billing city
    State T 2 Company billing state
    Zip T 11 Company billing zip
    WorkPhone T 18 Contact's work phone
    Sel Y/N Yes=Select this record for processing
    Comment T 255 Note about this record
    Usr T 10 User who last updated this record
    UpdDate Date Date this record was last updated

    tblInvoice
    InvoiceID Long Primary key
    ContactID Long Relates to tblContact
    InvoiceDate Date Date invoice was finalized and sent
    PaidDate Date Date invoice was paid in full
    Sel Y/N Yes=Select this record for processing
    PrivateNote T 255 Private note about this record
    Comment T 255 Note about this record
    Usr T 10 User who last updated this record
    UpdDate Date Date this record was last updated

    tblInvoiceDetail
    InvoiceDetailID Long Primary key
    InvoiceID Long Relates to tblInvoice
    ContactID Long Relates to tblContact for performance (opt)
    StartDate Date Date record was added to the invoice
    PartNo T 10 Relates to tblPart
    Part T 255 Short description of part or service
    Qty Long Number of items
    Price Single Price per item
    ExtPrice Single Price * Qty
    Sel Y/N Yes=Select this record for processing
    Comment T 255 Note about this record
    Usr T 10 User who last updated this record
    UpdDate Date Date this record was last updated

    tblPart
    PartNo T 50 Primary key
    Part T 50 Short description of part
    Price Single Price for a single part
    Category Long Relates to tblCategory
    Sel Y/N Yes=Select this record for processing
    Comment T 255 Note about this record
    Usr T 10 User who last updated this record
    UpdDate Date Date this record was last updated


Create a Single Form

  1. Create qryContact, a select query from tblContact. It will be the RecordSource for our first form, frmContact. Click Queries, New, DesignView and OK to see the ShowTable form. Highlight tblContact and click Add to put it into the QueryDesigner. Close the ShowTable window and drag each field from tblContact to the Field row of the QueryDesigner. Close the QueryDesigner and save as qryContact.
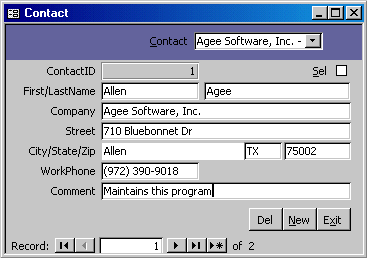
  2. Click Forms, New and choose qryContact as the query where the form's data comes from. We are going to create a single form called frmContact that will let us add, change and delete contacts. Here is the finished form:
  3. Set these form properties differ from the default:
    Property Value
    Caption Contact
    Default View Single Form
    Views Allowed Form
    Scroll Bars Neither
    Record Selectors No
    Dividing Lines No
    Auto Center Yes
    Key Preview Yes
    Cycle Current Record
    Shortcut Menu No
    Allow Design Changes Design View Only
  4. On the Access menu, check View, FormHeader/Footer. Set the FormHeader BackColor property to another color to help the user recognize that this is the area used to find a record.
  5. Click View, FieldList to see the fields in qryContact. Drag all the fields into the Detail section of the form.
  6. Position the fields and labels. Delete the labels for UpdDate and Usr. We will hide those fields . Also delete the LastName, State and Zip labels. Remove the Colon from each of the other labels. Edit FirstName to First/LastName and City to City/State/Zip and Sel to &Sel. Select all the labels by dragging a box around them or hold the shift key and click each label you want to select. Use the AlignRight button on the menu bar to move the text of the label to the right of the label field.

    Highlight the labels again, right-click, align, right to align the label fields to the right. Hold the shift key and press the right arrow until the right edges of the labels are a few pixels from the textboxes. With the labels still highlighted, right-click, size, fit to resize the label to fit the text it contains. Drag the textboxes to the desired positions on the form. Resize each textbox by dragging its right edge or holding shift and pressing the left or right arrow to shrink or expand it. Hold the Ctrl key and use the arrows to fine-tune the position of each textbox. You can also select objects, right-click and Align to align them.
  7. Rename each textbox to have a prefix of txt. For example, rename ContactID to txtContactID and LastName to txtLastName. This makes a clear distinction between the field name in the table and the field name on the form. Likewise, rename the Sel checkbox to chkSel. In general, use the following naming conventions for objects on the form:
    Control Prefix
    Combo Box cbo
    Command Button cmd
    Image img
    List Box lst
    Label lbl
    Line lin
    Option Group Frame fra
    Option Button opt
    Subform sfrm
    Tab Control tab
    Text Box txt
    Combo Box cbo
  8. After everything is aligned, click View, Tab Order, AutoOrder to set the order in which the fields are edited when you press the Tab key. Save the form and test the tab order. Enter at least two test records to see how the form works. Notice that the PgUp and PgDn keys move to the previous and next record.
  9. Lock the ContactID textbox. It is bound to a non-editable AutoNumber field so we don't want the cursor to even enter the field. RightClick on txtContactID and set the Locked property to Yes, Enabled to No and SpecialEffect to Etched. Hide txtUsr and txtUpdDate. Select txtUsr and txtUpdDate. Set their BackColor to Yellow so you can quickly find them as hidden fields. Set their Visible property to No. Set the SpecialEffect property of chkSel to Flat. Set the TabStop to No to remove it from the tab order. On txtWorkPhone, set the InputMask to \(999") "999\-9999. This makes the phone number easier to read while storing it in a consistent, easy to search format.
  10. In the next few steps, we will create an unbound combo box (cboContact), to select a specific conact. After we select the contact, the form will be synchronized to show that record.
  11. Create qryCboContact as the RowSource for the combo box. Add tblContact to the query designer and pull ContactID into the first field. We use this because it is the primary key to tblContact and positively identifies exactly one record in the table. We will hide this column later. Type the following into the field row of the second field:
    Contact: [Company] & ' - ' & [LastName] & ', ' & [FirstName] & ' (' & ContactID & ')'
    This compound field shows the Company, name and ContactID. Select the Ascending sort in the Sort row under the second column. Click the red ! to run the query. Save it as qryCboContact.
  12. Right-click frmContact and select Design View to reopen it in design view. Click the Combo Box tool on the toolbar and click in the Form Header to place a combo box on the form header. Cancel the wizard when it starts. Change the label to &Contact. The & character makes the next character (C) a hotkey. Alt-C now moves the cursor to cboContact where the label is attached. Align text to the right and resize the label to fit. Widen the combo box to near the label and position it in the form header.
  13. Set the combo box properties:
    Property Value
    Column Count 2
    Column Widths 0;2.5"
    List Width 2.5"
    RowSource qryCboContact
    Name cboContact
    Tab Stop No
    Run your form to see how the combo box looks. Notice that the data in the form doesn't change when you change the combo box.

    For this, we'll need some VBA!
    Open frmContact in the design view, right-click cboContact and select Properties to see the properties window. Click the Event tab. Click the white line to the right of After Update and select [Event Procedure] in the combo box. Click the ... to the right of the combo to see the Visual Basic window. This is where the code behind the form is located. It has a General Declarations area and lines that say:

    Private Sub cboContact_AfterUpdate()

    End Sub

    The code we will add to this subroutine will run After we Update the combo box named cboContact. Private means the code can only used by this form. Any memory variables it changes will not affect other objects in the database. End Sub is the last line of the code for this event. Between the lines above, type:
    Me.RecordsetClone.FindFirst "ContactID=" & Me!cboContact
    Me.Recordset.Bookmark = Me.RecordsetClone.Bookmark

    Save the form and open it to test your new combo box. If you typed the code correctly, the form data should now change to match the contact you select in the Contact combo box.

    Those two lines above are about as complicated as VBA gets.
    Let's look at some more simple VBA commands first.

    GENERAL VBA TIPS

    If you type DoCmd. in a code module, you'll see a menu of arguments for the DoCmd command. Here are some useful ones:

    FindRecord Find the next record containing a specified string
    GoToRecord Go to the Next, Previous, First, Last or New record
    Maximize Maximize the window within the database window. Good for reports.
    MenuItem Call Access menu commands. Good for Delete records.
    OpenForm Opens a form
    OpenQuery Runs a query. Use for update and append queries
    OpenReport Opens a report
    Quit Quits out of Access
    Requery Reruns the query under the form
    Restore Reverse of Maximize. Restores to sized window.
    RunCommand Rarely used but has practically every command in Access
    RunMacro Runs a macro. Macros should be converted to code
    RunSQL Runs a SQL string. Use for simple queries like Delete
    SendObject Sends an object (report) via email
    SetWarnings Docmd.SetWarnings False before an OpenQuery or RunSQL then set back to True
    TransferDatabase Export a query or table to an Access database or dBase .dbf (or import)
    TransferSpreadsheet Export a query or table to Excel (or import)
    TransferText Export query or table to Word .rtf or .txt (or import from .csv)

    After you type a DoCmd command, press the F1 key to see Access help on that command.

    Another important part of VBA is knowing how to refer to objects.
    You are already familiar with quite a few objects. Controls such as textboxes, combo boxes, checkboxes, lines, images and option groups are objects. They can be contained in forms or reports which are also objects. Tables, queries and macros are also objects. Think of objects as nouns in the English language. They are things. Objects have properties such as Width, Height or BackColor that describe them. Properties are like adjectives that describe nouns. Running VBA code is like the verb of a sentence. It causes the objects to act (OpenForm, RunSQL, Close, etc). Access has several collections of objects. All forms are in the Forms collection. queries in the QueryDefs collection, tables in the TableDefs collection and reports in the Reports collection. Each form has a Controls collection that contains the textboxes, labels, combo boxes and other controls for that form. Each table has a Fields collection. Most objects have a Properties collection. You generally specify the name of the collection and the name of the object within that collection.
    Specify from the general collection to the more specific collection and finally to the property. To refer to the value in a textbox named txtContactID in the form frmContact use
    Forms("frmContact").Controls("txtContactID").Value. The word Forms tells us that frmContact is in the Forms collection. We are further referring to the txtContactID control in frmContact's Controls collection and we have specified the property .Value which appears in the textbox.

    To see if the field txtUsr is visible on the frmContact form you would refer to:
    Forms("frmContact").Controls("txtUsr").Visible
    To set it to True
    Forms("frmContact").Controls("txtUsr").Visible=True

    You can also shorten the syntax of forms to
    Forms!frmContact!txtUsr.visible=True
    Note that we use the ! when separating collections such as the Forms collection and its Controls collection. We use the . to separate Properties from collections.

    When code in frmContact is running, you can refer to the form as Me instead of having to use the longer Forms!frmContact or Forms("frmContact"). Me!txtZip is the same as Forms("frmContact").Controls("txtZip").Value.

  14. Lets Improve cboContact. In the On Open event of frmContact, add the following line:

    Me!cboContact = Me!cboContact.ItemData(0)

    It sets the combo box cboContact to the first value in the RowSource. The ItemData collection is a zero based array, that is, the first value starts at zero as do most collections in Access. ItemData(1) would be the second record of the RowSource.

    If you use the PgUp or PgDn keys to navigate to the previous or next record, the combo box doesn't change. To keep it in synch with the form, Add the following lines to the Current event of frmContact:

    On Error Resume Next
    Me!cboContact = Me!txtContactID
    On Error GoTo 0

    The Current event fires when you move from one record to another. It fires a lot. Don't put a slow query here.
    This event fires before all the objects have data, so we need to ignore errors with the On Error Resume Next line. We then set the combo box to the value of txtContactID and turn off the error handler. Now the combo stays in synch with the form when you navigate through the records.

  15. Add three command buttons to the form footer. Name the command buttons cmdDel, cmdNew and cmdExit. Give them captions of Del, &New and E&xit. Size them the same height and width. Align them to the Top and position them in the lower right corner of the form. Make sure they aren't spaced unevenly by using Format, Horizontal Spacing, Decrease.
  16. Add code to the Del button. Place the following code in the On Click event of cmdDel:

    DoCmd.DoMenuItem acFormBar, acEditMenu, 8, , acMenuVer70
    DoCmd.DoMenuItem acFormBar, acEditMenu, 6, , acMenuVer70

    The first line selects the current record and the second line deletes it. This code was created by the wizard that runs when you create a new command button, select Record Operations and Delete Record.
  17. Add code to the New button. Place the following code in the On Click of cmdNew:

    DoCmd.GoToRecord , , acNewRec Me!txtFirstName.SetFocus The first line moves to the new record of the form like you clicked the >* button. The second line sets the focus to (puts the cursor on) txtFirstName of the form.
  18. Add code to the Exit button. Place the following code in the On Click of cmdExit:

    Docmd.Close

  19. Add an audit trail. Add the following code to the form's Before Update event:

    Me!txtUsr=CurrentUser()
    Me!txtUpdDate=Now()

    This code runs when the first letter of data is changed. The first line places your UserID in the Usr field of tblContact. That UserID is Admin for an unsecured Access database. The second line places the current date and time into the UpdDate field.

    We don't want the user to be able to edit these hidden fields but we want them to be able to read the data. We will create code so when the user presses Alt-Z, a messagebox appears. Put the following into the form's On Key Down event:

    If KeyCode = vbKeyZ And Shift = 4 Then
    MsgBox "Updated by " & Me!txtUsr & " on " & Me!txtUpdDate
    End If

    The constant vbKeyZ is the letter Z and Shift=4 is the Alt key. If that key combination is pressed at any time, the message box appears.
  20. Save the form and test the functions.


Create a Continuous Form


  1. Create qryInvoices, a select query from tblInvoice and tblContact joined on ContactID.
    Select InvoiceID, Company, InvoiceDate, PaidDate, Sel, Usr and UpdDate. Close and save as qryInvoices. This will be the RecordSource for the continuous form frmInvoices menu.
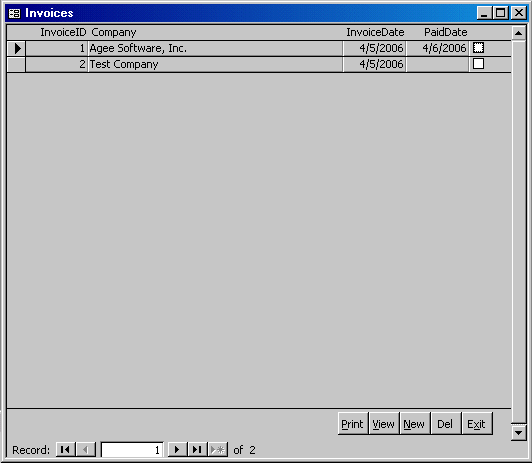
  2. Click Forms, New and choose qryInvoices as the query where the form's data comes from. We are going to create a continuous form called frmInvoices that will be a menu to select individual invoices for editing. We will have buttons on the form to add a New invoice, Delete an invoice, View an invoice or Print it to the printer. Here is the finished form:
  3. Set these form properties differ from the default:
    Property Value
    Caption Invoices
    Default View Continuous Forms
    Views Allowed Form
    Scroll Bars Vertical
    Auto Center Yes
    Allow Additions No
    Allow Deletions No
    Shortcut Menu No
    Allow Design Changes Design View Only
  4. On the Access menu, check View, FormHeader/Footer
  5. Click View, FieldList to see the fields in qryInvoices. Drag all the fields into the Detail section of the form.
  6. Position the Labels. Cut the labels InvoiceID, Company, InvoiceDate and PaidDate to the clipboard and paste them into the Form Header. Remove the Colon from each of the four labels. Delete the labels for Sel, Usr and UpdDate.
  7. Fine tune the positioning of objects. Drag the labels and fields into position. Highlight all the controls in the Detail area and Right-Click, Align, Top. You may have to hold the shift key and click the objects individually if you can't drag a box around all of them. Do the same for the labels. Use Right-Click, Align, Right and Left to align the fields. Highlight the textbox and label for InvoiceID, InvoiceDate and PaidDate. Right-Click, Size, Smallest to make those boxes narrow. Select the InvoiceDate label. Right-Click, Size, Fit to widen the label. Select InvoiceID, InvoiceDate and PaidDate again. Right-Click, Size, Widest to size them uniformly. While they are still highlighted, click the AlignRight icon (to the left of the paint bucket on the menu bar). Align the InvoiceID textbox under the InvoiceID label using Right-Click, Align, Right. Do the same for InvoiceDate and PaidDate. Select the Company textbox and Company label. Right-Click, Align, Left. After they are aligned, move them a pixel at a time by holding the Ctrl key down and pressing the Left arrow. You can move objects a pixel with the Ctrl key and arrows or hold Shift and press an arrow to make them a pixel wider or narrower, shorter or taller. You can also use Format, Horizontal, Decrease on the Access menu to move the textboxes closer together. Then use the Align tools to line up the labels. Select the Sel checkbox, Usr and UpdDate textboxes. Size them to Narrowest and drag them or use the Ctrl-LeftArrow to move them next to PaidDate.
  8. Save the form as frmInvoices.
  9. Set the following properties for the textboxes.
    • Set the InvoiceID textbox Name property to txtInvoiceID.
    • Put txt at the beginning of the Name property for each of the other textboxes.
    • Name the Sel checkbox chkSel.
    • Name the labels lblInvoiceID, lblCompany, etc.
    • Select txtInvoiceID, txtCompany, txtInvoiceDate and txtPaidDate. Set Enabled to No, Locked to Yes and SpecialEffect to Etched.
    • Select txtUsr and txtUpdDate. Set the Visible property to False. Set the BackColor to Yellow to make it easy to spot hidden fields in design view. You may need to hide many fields in a small area. Set their background color and avoid hiding them behind another control.
    • On the checkbox chkSel, set the SpecialEffect to Flat to make the checkmark easier to read.
  10. Add a command button to the form footer. Click Cancel on the Command button wizard and set the Caption of the Command button to E&xit. The & makes the letter x a hotkey. Pressing Alt-X on the keyboard has the same effect as clicking the button. Copy the Exit button four more times to create buttons for &New, Del, &View and &Print. Set the captions and name the button cmdNew, cmdDel etc. Set the ControlTipText of cmdNew to Add New Record. Set cmdDel to Delete this record. Set cmdView to View Invoice and cmdPrint to Print Invoice. Align and size the buttons using the Size, Align and Format tools. Set the TabStop to No on all five command buttons.
    Now, time for some VBA!

  11. Create VBA code for cmdExit. In the design view, Click cmdExit and select the Event tab of the properties window. Click the white portion of the On Click line. Pull the combo down and select [Event Procedure]. Click the ... to the right of the combo to open the VBA window. If you named the button correctly, you'll see:

    Option Compare Database
    Option Explicit

    Private Sub cmdExit_Click()

    End Sub

    Your code goes between the Private Sub and the End Sub

    Private Sub cmdExit_Click()
    Docmd.Close 'Close the form
    End Sub

    Click the X in the upper right to close the VBA window, save frmInvoices and double click to open it in normal mode. You should be able to click the Exit button and close the form.


    VBA Tips

    If you want to change a textbox SpecialEffect from the default Sunken to Etched in code, Press Ctrl-G to go to the debug window and
    ? forms!frmInvoices!txtPaidDate.SpecialEffect
    If txtPaidDate is Etched, the line will return 3. If it is Sunken the line will return 2.
    Knowing that constant, you could set txtPaidDate to Etched or Sunken.

    Using SQL, you could delete the current record in frmInvoices by:
    Docmd.RunSQL "DELETE FROM tblInvoice WHERE InvoiceID=" & Forms!frmInvoice!txtInvoiceID
    The form must be open (it can be hidden or in the design view) to refer to it using Forms!

    InvoiceID above is a numeric value so it needs no delimiter. If you refer to a text field, enclose the value in single or double quotes.
    DoCmd.RunSQL "Update tblInvoice SET Sel=True WHERE Usr='" & CurrentUser() & "'"
    The line above would select all records that you last updated.
    If you refer to a Date, enclose it in #'s.
    DoCmd.RunSQL "Update tblInvoice SET UpdDate=#" & Now*() & "#" The shortest way to refer to objects WITHIN the open form is to use Me.
    Me!txtInvoiceID refers to the value in the textbox txtInvoiceID on the currently running form.


  12. Using the techniques above, edit the On Click event of the cmdPrint button to:

    Private Sub cmdPrint_Click()
    DoCmd.OpenReport "rptInvoice" 'This prints all the invoices
    End Sub

    Note the arguments for DoCmd.OpenReport are ReportName, View, FilterName and WhereCondition.
    To print just the current invoice:

    Private Sub cmdPrint_Click()
    DoCmd.OpenReport "rptInvoice", , ,"InvoiceID=" & Me!txtInvoiceID
    End Sub

    After you test the report, add error handling around the command.

    Private Sub cmdPrint_Click()
    On Error Resume Next 'Ignores errors in the lines below
    'Send the report rptInvoice to the Printer and set the WhereCondition to the current invoice
    DoCmd.OpenReport "rptInvoice", , ,"InvoiceID=" & Me!txtInvoiceID
    On Error GoTo 0 'Turns off error handling
    End Sub

  13. Create an On Click event for the cmdView button.
    Copy the code from cmdPrint and add the constant acViewPreview to send the report to the screen.

    Private Sub cmdView_Click()
    On Error Resume Next 'Ignores errors in the lines below
    'Send the report rptInvoice to the Screen and set the WhereCondition to the current invoice
    DoCmd.OpenReport "rptInvoice", acViewPreview, ,"InvoiceID=" & Me!txtInvoiceID
    On Error GoTo 0 'Turns off error handling
    End Sub

  14. Create an On Click event for the cmdDel button.

    Private Sub cmdDel_Click()
    'Confirm user wants to delete record. Show Yes and No buttons.
    Title window 'Del Rec'.
    'If answer is Yes, continue to delete record.
    If MsgBox ("Delete this record?",vbYesNo,"Del Rec")=vbYes Then
      Docmd.SetWarnings False 'Run query without warning user
    'Delete InvoiceDetail records then Invoice record.
      DoCmd.RunSQL "DELETE FROM tblInvoiceDetail WHERE InvoiceID=" & me!txtInvoiceID
      DoCmd.RunSQL "DELETE FROM tblInvoice WHERE InvoiceID=" & me!txtInvoiceID
      Docmd.SetWarnings False 'Return to warning user before running action queries
      Me.Requery 'Requery the form data to remove deleted record
    End If
    End Sub

  15. Create an On Click event for the cmdNew button.

    Private Sub cmdNew_Click()
    Dim nContactID As Long
    'Use our custom formula IsOpen() to see if frmContact is open
    If Not IsOpen("frmContact") Then 'Not open.
      DoCmd.OpenForm "frmContact" 'Open frmContact and notify user
      MsgBox "Please select a Contact on the Contact form first"
      Exit Sub 'Exit without appending a new invoice
    End If
    DoCmd.SetWarnings False 'Don't warn user when running an action query
    'Append new Invoice record
    DoCmd.RunSQL "INSERT INTO tblInvoice (ContactID, Usr, UpdDate) VALUES (" _
      & Forms!frmContact!txtContactID & ", '" & CurrentUser() & "', #" & Now() & "#)"
    DoCmd.SetWarnings True 'Return to warning user when running action query
    Me.Requery 'Requery the data in frmInvoices to include the new record
    End Sub