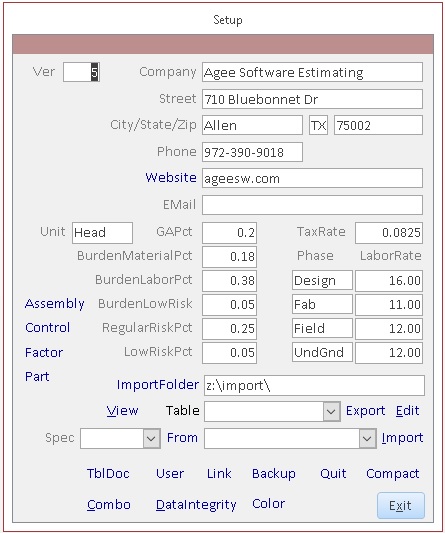
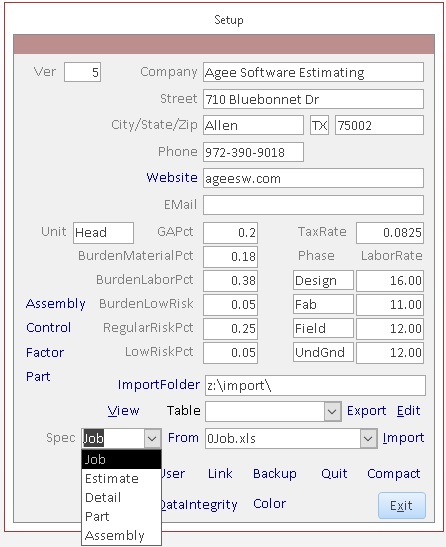
 The Setup form lets you customize the application for your company.
Name each of four Phases to customize estimates for construction,
auto repair or even software development using the same application. Choose
a custom tracking Unit like head, page, form or mile that will appear on
reports as hours per page or dollars per mile. You can set the Tax Rate
and Labor Rates for each phase of the job.
By setting default Regular Risk Percentage and Low Risk Percentage,
you can mark up your costs. Burden for Material, Labor and Low Risk work
let you add indirect costs associated with direct labor. GAPct covers
sales, general and administrative expenses. You can adjust these default values
for each job or estimate.
The Setup form lets you customize the application for your company.
Name each of four Phases to customize estimates for construction,
auto repair or even software development using the same application. Choose
a custom tracking Unit like head, page, form or mile that will appear on
reports as hours per page or dollars per mile. You can set the Tax Rate
and Labor Rates for each phase of the job.
By setting default Regular Risk Percentage and Low Risk Percentage,
you can mark up your costs. Burden for Material, Labor and Low Risk work
let you add indirect costs associated with direct labor. GAPct covers
sales, general and administrative expenses. You can adjust these default values
for each job or estimate.
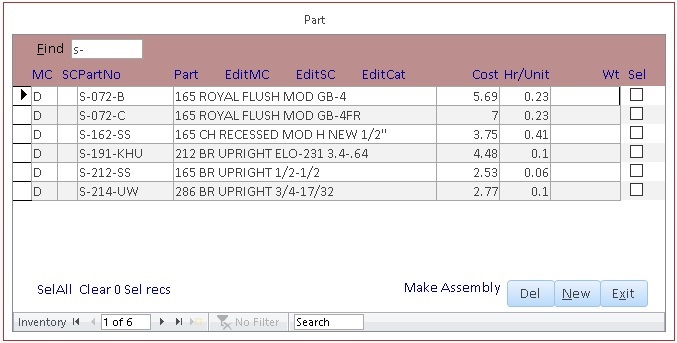 Estimate details contain Parts which each have a cost, weight and may have a number of
hours per unit to install the part. Parts are grouped into categories, which are further
grouped into major categories (MC) like Pipe, Fittings, Hangers, Devices, Underground,
Low Risk or Rentals. Click EditMC to edit the major category or EditCat
to edit the category. Enter -1 in the Sort column if the Category is tax free.
Parts are also grouped into sub categories like Taps/Permits, Materials, Bonds, Sales Tax,
Subcontracts or Rentals. Click EditSC to see the list of sub categories. Each part
must have a MC and may have a SC. The first letter of the PartNo must also match the letter
of the Category within the MC. You can edit Cat, MC and SC in the Combo form.
TIP: As you type the PartNo on the Detail form, the pointer will move within the list if the
next character is in the list. If it is not, you can still select the part, but it
can be time consuming if you have thousands of parts. Enter a PartNo like B-- or C--
for each letter. If you type C-- in the PartNo combo, it will move the pointer to the
top of the list of parts in category C to make selection easier.
Estimate details contain Parts which each have a cost, weight and may have a number of
hours per unit to install the part. Parts are grouped into categories, which are further
grouped into major categories (MC) like Pipe, Fittings, Hangers, Devices, Underground,
Low Risk or Rentals. Click EditMC to edit the major category or EditCat
to edit the category. Enter -1 in the Sort column if the Category is tax free.
Parts are also grouped into sub categories like Taps/Permits, Materials, Bonds, Sales Tax,
Subcontracts or Rentals. Click EditSC to see the list of sub categories. Each part
must have a MC and may have a SC. The first letter of the PartNo must also match the letter
of the Category within the MC. You can edit Cat, MC and SC in the Combo form.
TIP: As you type the PartNo on the Detail form, the pointer will move within the list if the
next character is in the list. If it is not, you can still select the part, but it
can be time consuming if you have thousands of parts. Enter a PartNo like B-- or C--
for each letter. If you type C-- in the PartNo combo, it will move the pointer to the
top of the list of parts in category C to make selection easier.
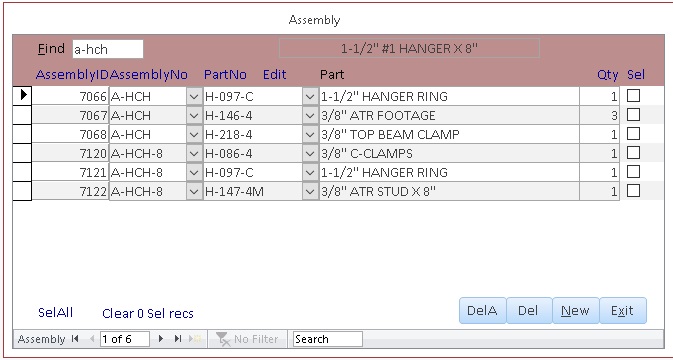 Parts can be combined into an Assembly to
simplify data entry. Cost of the assembly is updated if any of the part costs or labor
changes. Add the Assembly to the Part form with a PartNo beginning with A,
check Sel for it and the parts you want to include in the assembly, and click
Make Assembly on the Part form. On the Part form, if the PartNo begins
with A, you'll see a blue link like nn Assembly Components that you can
click to see the Assembly form for that part.
Parts can be combined into an Assembly to
simplify data entry. Cost of the assembly is updated if any of the part costs or labor
changes. Add the Assembly to the Part form with a PartNo beginning with A,
check Sel for it and the parts you want to include in the assembly, and click
Make Assembly on the Part form. On the Part form, if the PartNo begins
with A, you'll see a blue link like nn Assembly Components that you can
click to see the Assembly form for that part.
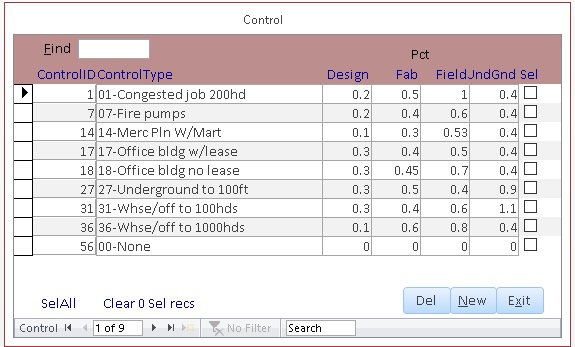
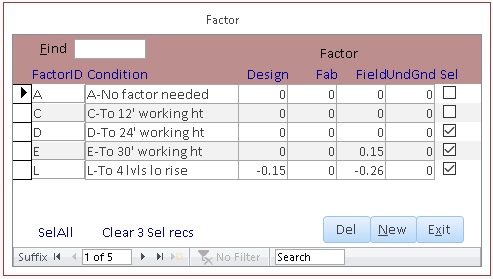 Default Control and Factor percentages are added to set the percentages
of total labor allocated to each phase of the job. You can further adjust them on
the Job and estimate forms.
You can View the raw data read-only in each table in the system. Click
Export to export the table to Excel XLS, Comma Separated Values CSV,
HTM, TXT or Access MDB. Enter the path of the file you want to save, for example
C:\Work\Job.xls. By default, files are put into the Import Folder you set
in the line above. If you click Edit for a table, you can edit or search all
the values in the table. For example, the Estimate form opened from the Job form
shows only estimates for that job. If you Edit Estimate from the Table combo,
the form shows all estimates in the entire system.
Default Control and Factor percentages are added to set the percentages
of total labor allocated to each phase of the job. You can further adjust them on
the Job and estimate forms.
You can View the raw data read-only in each table in the system. Click
Export to export the table to Excel XLS, Comma Separated Values CSV,
HTM, TXT or Access MDB. Enter the path of the file you want to save, for example
C:\Work\Job.xls. By default, files are put into the Import Folder you set
in the line above. If you click Edit for a table, you can edit or search all
the values in the table. For example, the Estimate form opened from the Job form
shows only estimates for that job. If you Edit Estimate from the Table combo,
the form shows all estimates in the entire system.
 You can Import XLS files to Assembly, Part, Job, Estimate and Detail tables.
Use Export to create a template of the .XLS file. Field names for import must match
the exported field names exactly, although the order of fields isn't important.
Select the Spec and filename in the Import Folder. You can view the files
in the Import Folder by clicking on the blue ImportFolder link or clicking the
blue From link. When you are ready to import the file, click Import.
NOTE: Job, Estimate and Detail are related tables and must be imported in that sequence
because key values will be changed in all three tables when Detail is imported.
TblDoc creates an HTML data dictionary that shows data type and description of
each field and primary key and number of records in each table.
You can Import XLS files to Assembly, Part, Job, Estimate and Detail tables.
Use Export to create a template of the .XLS file. Field names for import must match
the exported field names exactly, although the order of fields isn't important.
Select the Spec and filename in the Import Folder. You can view the files
in the Import Folder by clicking on the blue ImportFolder link or clicking the
blue From link. When you are ready to import the file, click Import.
NOTE: Job, Estimate and Detail are related tables and must be imported in that sequence
because key values will be changed in all three tables when Detail is imported.
TblDoc creates an HTML data dictionary that shows data type and description of
each field and primary key and number of records in each table.
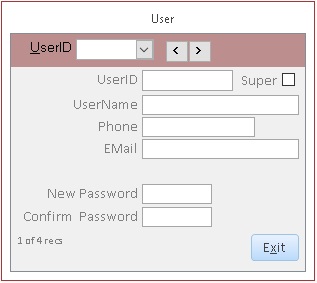 Set up users on the User form. Enter contact info and and check Super if you
want the user to see and edit all features of the database and have the ability to
add or delete other users. Leave the Super box unchecked for normal users. Enter and
confirm a password for the user. The user can change his or her password on this form.
Passwords are encrypted into a hash table for security. The user's password is not
the same as the database password.
Set up users on the User form. Enter contact info and and check Super if you
want the user to see and edit all features of the database and have the ability to
add or delete other users. Leave the Super box unchecked for normal users. Enter and
confirm a password for the user. The user can change his or her password on this form.
Passwords are encrypted into a hash table for security. The user's password is not
the same as the database password.
 Click Link to set the location of the shared data tables. Each user normally has
a copy of the front end database, c:\work\Est.accdb, where forms, reports and queries
are stored. The back end database, z:\EstDat.accdb, where shared tables are stored is
on a network shared folder unless only one person will be using the database. You can
have a separate set of data tables for training, archives, or other sites. The
developer can set the location of data tables for you to simplify installing updates.
Click Link to set the location of the shared data tables. Each user normally has
a copy of the front end database, c:\work\Est.accdb, where forms, reports and queries
are stored. The back end database, z:\EstDat.accdb, where shared tables are stored is
on a network shared folder unless only one person will be using the database. You can
have a separate set of data tables for training, archives, or other sites. The
developer can set the location of data tables for you to simplify installing updates.
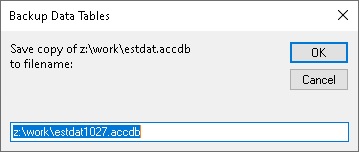 Click Backup to save the shared data tables to a flash drive or other network
location. The current date is part of the name. See
http?//ageesw.com/bak.htm for more info on backups.
Click Backup to save the shared data tables to a flash drive or other network
location. The current date is part of the name. See
http?//ageesw.com/bak.htm for more info on backups.

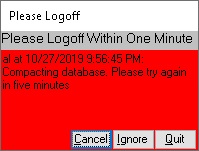 Click Quit to force users out of the database within two minutes so you can
compact or restore the database or change table structure. Users will see all
forms turn red and normal users will not be able to log in until a super user
clicks Cancel. Super users can Ignore the quit to do maintenance.
Click Quit to force users out of the database within two minutes so you can
compact or restore the database or change table structure. Users will see all
forms turn red and normal users will not be able to log in until a super user
clicks Cancel. Super users can Ignore the quit to do maintenance.
 Compact the shared data tables monthly. This rebuilds indexes and copies undeleted
records to a new copy of the database, making it more compact and reliable. This process
also lets you recover from corrupted records that can occur if you have a power or
network failure while saving a record to disk.
Compact the shared data tables monthly. This rebuilds indexes and copies undeleted
records to a new copy of the database, making it more compact and reliable. This process
also lets you recover from corrupted records that can occur if you have a power or
network failure while saving a record to disk.
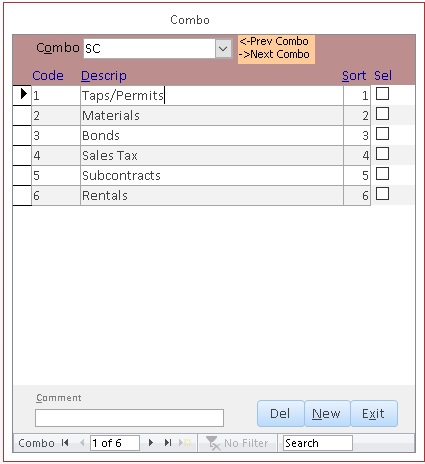 Click Combo to edit values for major category, category or sub category. Select
MC, Cat or SCthe Combo in the combo at the top of the form to edit the values. On the
Cat combo, put -1 in the Sort field if the category is not taxable. Leave Sort
set to 0 if the category is taxable. Contact the developer if you are not sure if it is
safe to change or delete a combo value.
Click Combo to edit values for major category, category or sub category. Select
MC, Cat or SCthe Combo in the combo at the top of the form to edit the values. On the
Cat combo, put -1 in the Sort field if the category is not taxable. Leave Sort
set to 0 if the category is taxable. Contact the developer if you are not sure if it is
safe to change or delete a combo value.
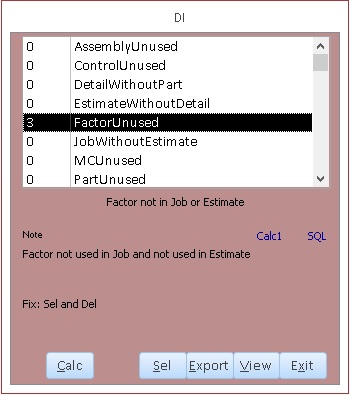 The Data Integrity form lets you store queries that show problems with data that
may affect reports or clutter the data. Click Calc to count the number of problems
exist for each query. Each query has a description, a note and a suggested way to fix the
problem. The blue Calc1 link recalculates the current query, where Calc recalculates the
problems in all queries. The SQL link shows the precise SQL for those who want
that level of detail.
The Data Integrity form lets you store queries that show problems with data that
may affect reports or clutter the data. Click Calc to count the number of problems
exist for each query. Each query has a description, a note and a suggested way to fix the
problem. The blue Calc1 link recalculates the current query, where Calc recalculates the
problems in all queries. The SQL link shows the precise SQL for those who want
that level of detail.
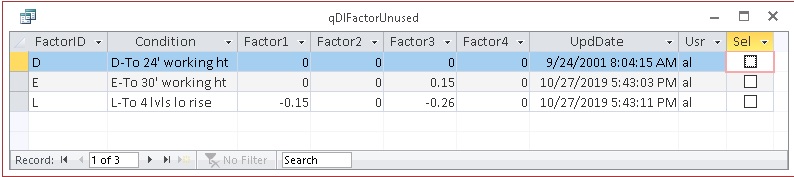 Click View to see the problem records for that highlighted query read only. You
cab right-click and sort A-Z or Z-A on any column. Click Export to export the
viewed records to Excel XLS. Click Sel to check the Sel checkbox on each
problem record and open the appropriate form to show the selected records. This lets
you quickly correct the problems. Use Calc or Calc1 after making corrections.
Click View to see the problem records for that highlighted query read only. You
cab right-click and sort A-Z or Z-A on any column. Click Export to export the
viewed records to Excel XLS. Click Sel to check the Sel checkbox on each
problem record and open the appropriate form to show the selected records. This lets
you quickly correct the problems. Use Calc or Calc1 after making corrections.
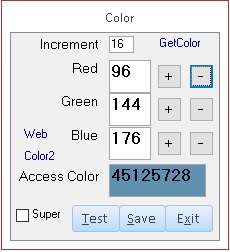 The Color form lets you select the form color for normal users or super users.
Click GetColor and note the 8 digit Access Color value. Use the + and - buttons for
red, green and blue to adjust the color values in the color box. When you are satisfied
with the color, click Test to see how forms look temporarily or Save to save the color
for all normal users. Check Super before clicking Save to save a color for super users.
The Web link provides more color samples and Color2 gives you another way to set the
color value.
Close
The Color form lets you select the form color for normal users or super users.
Click GetColor and note the 8 digit Access Color value. Use the + and - buttons for
red, green and blue to adjust the color values in the color box. When you are satisfied
with the color, click Test to see how forms look temporarily or Save to save the color
for all normal users. Check Super before clicking Save to save a color for super users.
The Web link provides more color samples and Color2 gives you another way to set the
color value.
Close
|