|
Set store defaults, invoice logo and application form color on the Setup form.
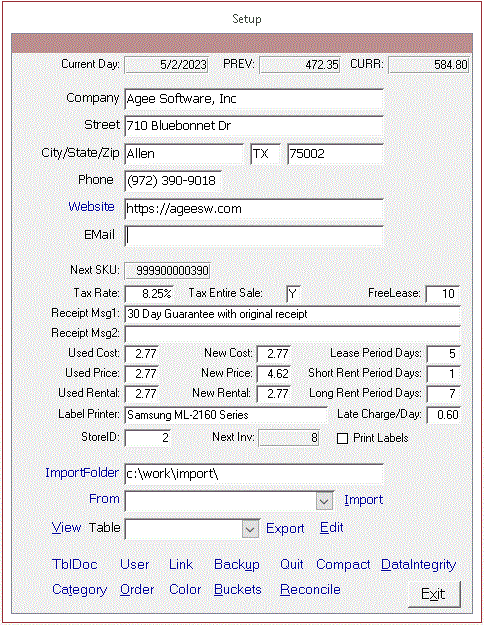 Set up store. The status bar at bottom of your screen shows what is expected in each field as you tab through the fields. Blue links can be clicked.
Hover over the blue link for a second to see what it does.
Click TblDoc at the bottom of the form for a data dictionary.
Print Labels: Yes=Automatically print CustLabels from the Customer form. Print SKU label on Buy, Purchase and Lease Return and Lease Label on Lease. No=Ask before printing
Label Printer: If you have a label printer on your network, you can specify it on the Setup form. Labels will be sent
to the label printer, while other reports and invoices will be sent to your PC's default printer. If the PC sharing the
label printer is named \\POS1 and the printer is shared with the name Zebra, enter \\POS1\Zebra in the field.
To find a PC's name, enter WhoAmI at the Cmd prompt. The PC name is left of the \ and your current userid is to the right.
To find the printer name, enter Control from the cmd prompt or Window key- to open the control panel. Select View Devices and
Printers under Hardware. Right click your printer, select Printer Properties and look for a Sharing tab.
Import: To Import Customer, Inventory, SaleHead or SaleDetl data, Select Cust, Inv, SaleHead or SaleDetl on the Table combo and choose an .XLS file to import from the Import Folder in the From combo.
You can click From to view the file before importing. Leave the From combo blank to create a sample .XLS file to import. Once you are satisfied with the data and
format, click Import to import the file. The imported records with have SEL checked. You can view them by selecting the Table and clickinig View.
NOTE: Make a backup before importing. The primary key for the Inventory table is SKU. If a SKU already exists in the Inv table, it will not be imported again.
Likewise, InvoiceID is the primary key to the SaleHead table. InvoiceIDs that exist in the SaleHead table will not be imported again. The SaleDetl table generates a primary
key for each imported record, but the table is related to SaleHead on InvoiceID. SaleHead and Detl should always be imported as a set. InvoiceIDs should match in both tables.
Totals are not recalculated for SaleHead records upon import. For these reasons, you should generally only import SaleHead and SaleDetl when setting up a new store that
used a different system. Times may be entered in several forms: 2p, 14:00, 2:00:00 PM are all the same time.
TblDoc creates an HTML data dictionary to show what is expected in each field in the system.
Set up store. The status bar at bottom of your screen shows what is expected in each field as you tab through the fields. Blue links can be clicked.
Hover over the blue link for a second to see what it does.
Click TblDoc at the bottom of the form for a data dictionary.
Print Labels: Yes=Automatically print CustLabels from the Customer form. Print SKU label on Buy, Purchase and Lease Return and Lease Label on Lease. No=Ask before printing
Label Printer: If you have a label printer on your network, you can specify it on the Setup form. Labels will be sent
to the label printer, while other reports and invoices will be sent to your PC's default printer. If the PC sharing the
label printer is named \\POS1 and the printer is shared with the name Zebra, enter \\POS1\Zebra in the field.
To find a PC's name, enter WhoAmI at the Cmd prompt. The PC name is left of the \ and your current userid is to the right.
To find the printer name, enter Control from the cmd prompt or Window key- to open the control panel. Select View Devices and
Printers under Hardware. Right click your printer, select Printer Properties and look for a Sharing tab.
Import: To Import Customer, Inventory, SaleHead or SaleDetl data, Select Cust, Inv, SaleHead or SaleDetl on the Table combo and choose an .XLS file to import from the Import Folder in the From combo.
You can click From to view the file before importing. Leave the From combo blank to create a sample .XLS file to import. Once you are satisfied with the data and
format, click Import to import the file. The imported records with have SEL checked. You can view them by selecting the Table and clickinig View.
NOTE: Make a backup before importing. The primary key for the Inventory table is SKU. If a SKU already exists in the Inv table, it will not be imported again.
Likewise, InvoiceID is the primary key to the SaleHead table. InvoiceIDs that exist in the SaleHead table will not be imported again. The SaleDetl table generates a primary
key for each imported record, but the table is related to SaleHead on InvoiceID. SaleHead and Detl should always be imported as a set. InvoiceIDs should match in both tables.
Totals are not recalculated for SaleHead records upon import. For these reasons, you should generally only import SaleHead and SaleDetl when setting up a new store that
used a different system. Times may be entered in several forms: 2p, 14:00, 2:00:00 PM are all the same time.
TblDoc creates an HTML data dictionary to show what is expected in each field in the system.
 Set up users
Link lets you specify where the shared linked tables are located. Default for a single register store is c:\work\POSDat.mdb. Default for a multi-register store
is z:\POSDat.mdb. You can copy the front end (forms, reports and queries in c:\work\POS.mdb) to another name or location and set up a copy of the database for
training or archived data.
Backup lets you copy the shared data tables to another location. Default is c:\work\POSDat_yymmdd.mdb where yymmdd is the current date. Keep a regularly copied
copy of the data on a flash drive in a safe off-site location.
Set up users
Link lets you specify where the shared linked tables are located. Default for a single register store is c:\work\POSDat.mdb. Default for a multi-register store
is z:\POSDat.mdb. You can copy the front end (forms, reports and queries in c:\work\POS.mdb) to another name or location and set up a copy of the database for
training or archived data.
Backup lets you copy the shared data tables to another location. Default is c:\work\POSDat_yymmdd.mdb where yymmdd is the current date. Keep a regularly copied
copy of the data on a flash drive in a safe off-site location.
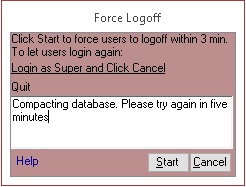
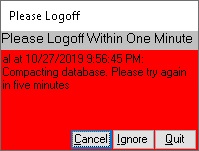 Quit lets you gently force users out of the system in a multi-register system. This lets you have exclusive use of the data tables to make data structure changes,
or to compact and repair the database. A super user clicks Quit and enters a message to be shown to users like I need to compact the database. Try again in 10 min.
You will be logged off the system. Within a minute, all users will see the message and their forms will turn red. In another minute, normal users will be forced
out of the system and can't log in until the Quit is cancelled. Super users can log onto the system and Ignore or Cancel the Quit command.
Compact copies non-deleted records in the data tables to another database, rebuilds indexes, renames the new database and deletes the old database. This repairs
corrupted records, shrinks the database size and optimizes performance. You must be the only user in the database to compact it. Compact the database at least weekly.
Quit lets you gently force users out of the system in a multi-register system. This lets you have exclusive use of the data tables to make data structure changes,
or to compact and repair the database. A super user clicks Quit and enters a message to be shown to users like I need to compact the database. Try again in 10 min.
You will be logged off the system. Within a minute, all users will see the message and their forms will turn red. In another minute, normal users will be forced
out of the system and can't log in until the Quit is cancelled. Super users can log onto the system and Ignore or Cancel the Quit command.
Compact copies non-deleted records in the data tables to another database, rebuilds indexes, renames the new database and deletes the old database. This repairs
corrupted records, shrinks the database size and optimizes performance. You must be the only user in the database to compact it. Compact the database at least weekly.
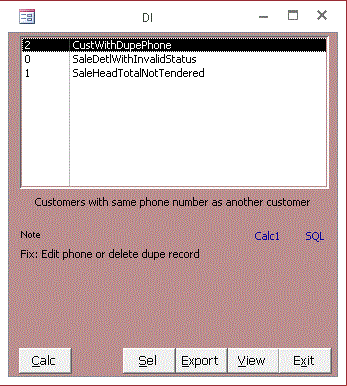 Data Integrity shows missing, duplicate or invalid data. It can also be used to find and reconcile errors.
The number to the left of each query shows the number of problem records. Click Calc1 to update the number for that
query or Calc to update all queries. View shows the records in error for that query. Click Export to save them
to Excel or click Sel to select the records in the appropriate table and open a form to edit them. If the records
can be fixed with an SQL statement instead of hand editing them, the Fix button appears. The SQL link shows the
specific SQL of the query.
Data Integrity shows missing, duplicate or invalid data. It can also be used to find and reconcile errors.
The number to the left of each query shows the number of problem records. Click Calc1 to update the number for that
query or Calc to update all queries. View shows the records in error for that query. Click Export to save them
to Excel or click Sel to select the records in the appropriate table and open a form to edit them. If the records
can be fixed with an SQL statement instead of hand editing them, the Fix button appears. The SQL link shows the
specific SQL of the query.
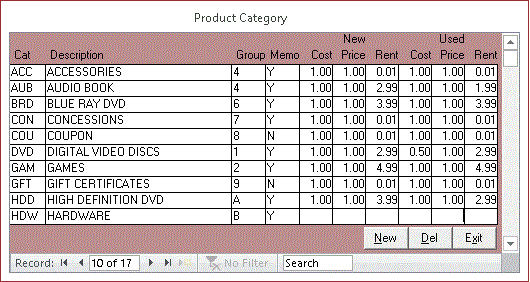 Category Form lets you organize your merchandise for inventory, searching and ordering.
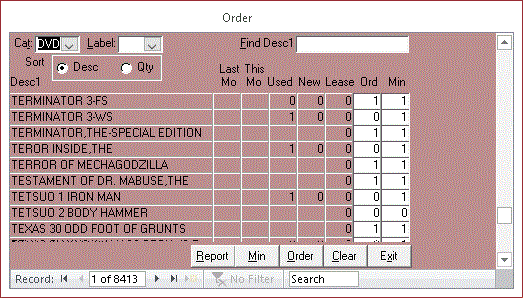 Order Form helps you create an order from your supplier. It compares the inventory level to minimum stockage level for each item and lets you adjust the quantity ordered.
You can select Cat and Label to filter the records. Rpt opens the OrderRpt form. Qty changes the minimum order quantity for items with that label. Clear sets quantity ordered to null for all items.
Order Form helps you create an order from your supplier. It compares the inventory level to minimum stockage level for each item and lets you adjust the quantity ordered.
You can select Cat and Label to filter the records. Rpt opens the OrderRpt form. Qty changes the minimum order quantity for items with that label. Clear sets quantity ordered to null for all items.
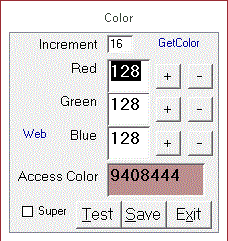 Color Form: Lets you set the form color for different users or to show a difference between normal and super users.
Check Super for super user or uncheck it for normal users. Click GetColor to get the 8 digit color value that is
currently used. Click the + or - key by Red, Green or Blue to experiment with different colors. Click Test to see
how forms look temporarily or click Save to save it for all forms for all users or super users. The default color is 41975984
Buckets: Updates the number of each item sold and leased by month for the last 12 months on the Inventory form.
It runs automatically on the first of each month and you can run it any time by clicking Buckets on the Setup form.
Color Form: Lets you set the form color for different users or to show a difference between normal and super users.
Check Super for super user or uncheck it for normal users. Click GetColor to get the 8 digit color value that is
currently used. Click the + or - key by Red, Green or Blue to experiment with different colors. Click Test to see
how forms look temporarily or click Save to save it for all forms for all users or super users. The default color is 41975984
Buckets: Updates the number of each item sold and leased by month for the last 12 months on the Inventory form.
It runs automatically on the first of each month and you can run it any time by clicking Buckets on the Setup form.
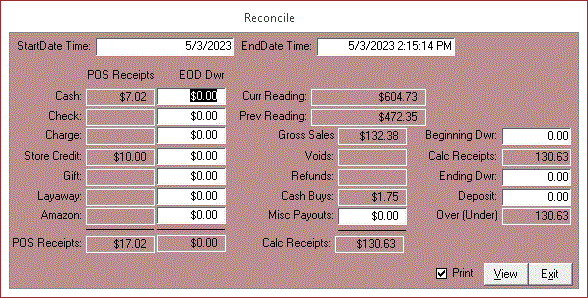 Reconcile Form lets you reconcile receipts at the end of the day. Enter the amounts of each payment type received and click View to see or print the Reconcile Cash report.
Install Barcode Font:
Reconcile Form lets you reconcile receipts at the end of the day. Enter the amounts of each payment type received and click View to see or print the Reconcile Cash report.
Install Barcode Font:
If your label barcodes look like *1234567890*, you need to install the 3 of 9 barcode font.
- Click 3of9.ttf and save to Downloads folder. (May have to Right-click, Save Target As)
- Right-Click Start button in lower left of screen. Select Search, type Font and select Font Settings.
- Drag 3of9.ttf from Downloads folder (Yellow File Explorer icon in lower left of screen or Explorer from Cmd prompt, then click Downloads) and drop onto the Add Fonts box.
Troubleshooting tip: Open a word processor like WordPad. (Write from the Cmd prompt). Click the Font combo and scroll up the list between fonts beginning with @ and A. You should see a barcode font.
Open Cash Drawer: Identify your printer model and cash drawer model and Google for Open ___ cash drawer from ___ printer.
For example
If your printer doesn't support a cash drawer, try Open Cash Drawer Without Printer
Close
|